
Installing mPlus Copernica Plugin is similar to installing any other plugins in WordPress. Simply follow these steps:
- Collect the plugin zip file and extract it on your-wp-install/wp-content/plugins directory. Please confirm that this file exists in similar manner: your-wp-install/wp-content/plugins/copernica-lite/copernica.php
- Now go to WP Admin – Plugins. Find the Copernica plugin and Activate it.

- Then go to WP Admin – Copernica and enter the Access Token, then hit Save Changes. This should populate a list of databases in the Database ID.
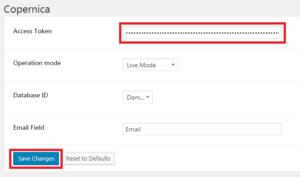
- Choose a Database ID appropriate to you.
- Also choose the Operation mode. Live mode will work like it should work in the actual run. Sandbox mode will allow you to test the plugin.